AndDone Integration
Last updated: April 10, 2026
Introduction
This article explains how the AndDone integration works within BindHQ and how MGAs or wholesalers can enable premium payments through invoices. The invoice includes a payment link that directs the payer to an AndDone payment page.
The integration allows Retail Agents (for Agency Bill) and Insureds (for Insured Direct Bill) to securely pay MGAs or wholesalers using ACH, credit card, or debit card, while automatically recording payments and generating receipts in BindHQ.
It also outlines the full payment workflow, from binding a policy or issuing an endorsement to reviewing payment records in Accounting, helping reduce manual effort and streamline accounts receivable processes.
Enabling and configuring the AndDone integration
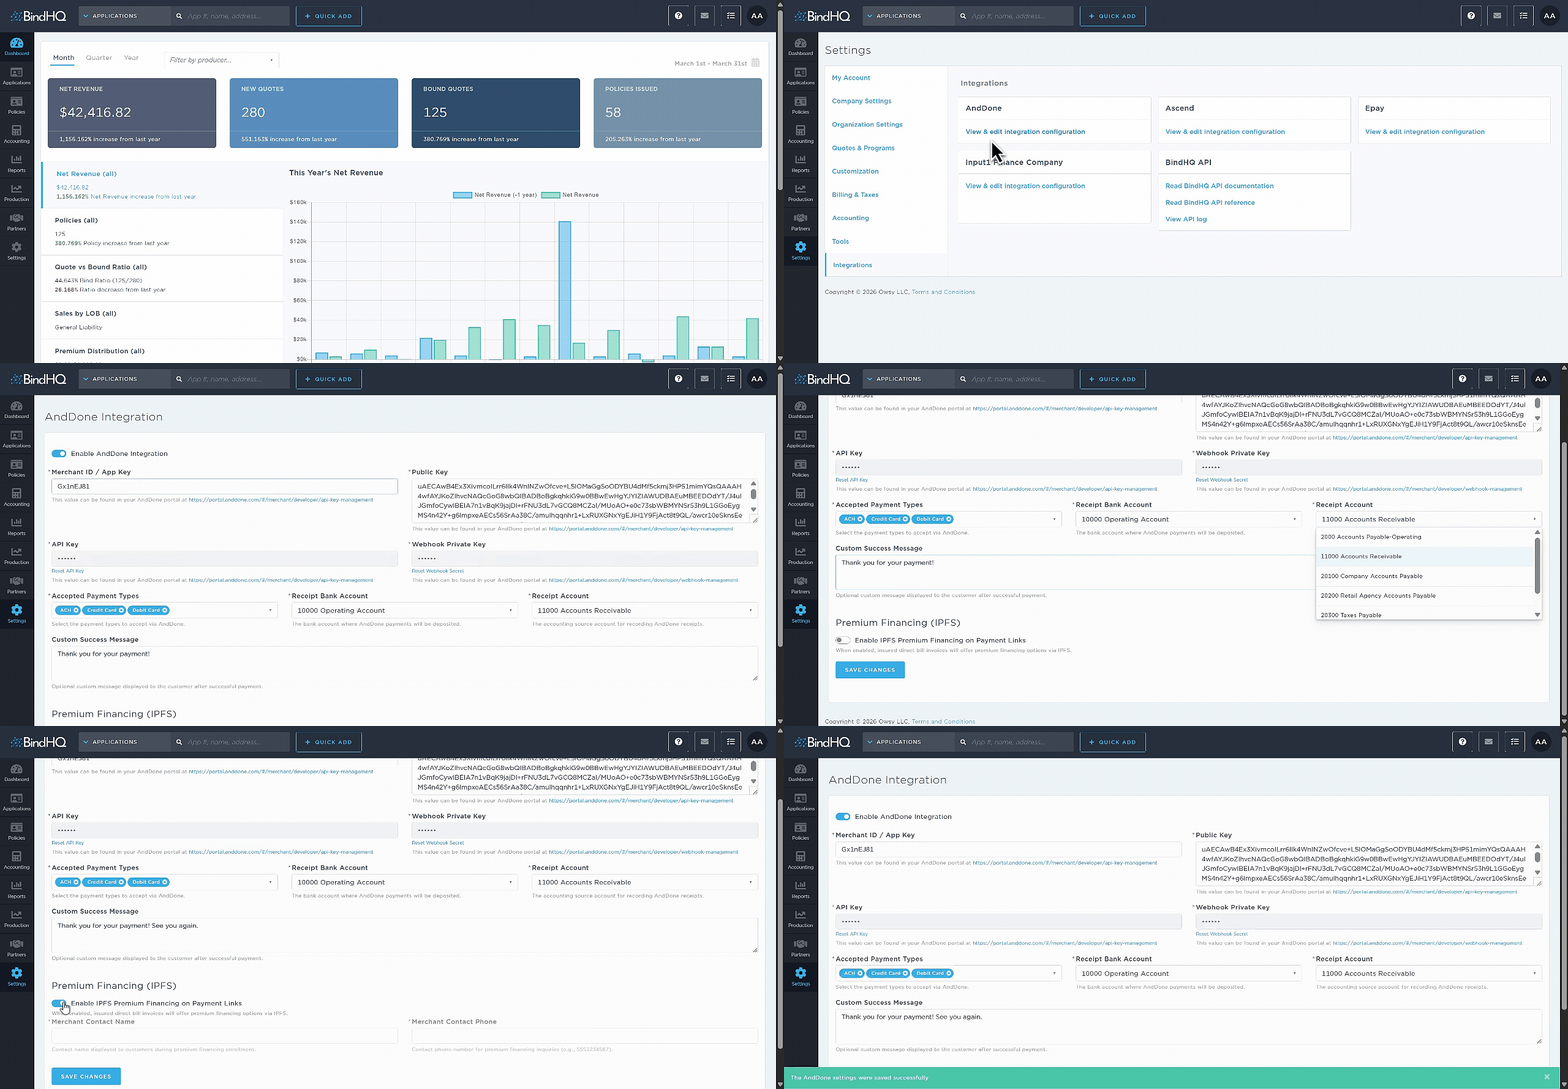
Administrators can enable the AndDone integration by navigating to:
Settings → Integrations → Under AndDone → View & Edit Integration Configuration
On the same configuration page, complete the following setup:
1. Enable Integration & Credentials
Turn on the Enable AndDone Integration toggle and enter the required credentials from your AndDone portal:
Merchant ID / App Key
Public Key
API Key
Webhook Private Key
These keys are available in the AndDone developer portal.
2. Configure Payment Settings
Set up how payments will be accepted and recorded:
Accepted Payment Types: Select the payment methods you want to allow: ACH, Credit Card and Debit Card
Receipt Bank Account: The bank account where AndDone deposits will be recorded.
Receipt Account: The general ledger account used to record incoming payments.
By default, BindHQ recommends:
Receipt Bank Account: Undeposited Funds
Receipt Account: Accounts Receivable
This setup ensures:
Payments are recorded against Accounts Receivable in near real time
Funds are temporarily held in Undeposited Funds
Once funds are transferred (typically within 2 business days), they can be moved to your operating account via a batch deposit
For more details on AndDone’s funding timelines, refer to How long does it take to receive money after a payment is settled?
3. Customer Experience Settings
You can optionally configure:
Custom Success Message: A message displayed to the customer after a successful payment. (Example: “Thank you for your payment!”)
4. Premium Financing (IPFS)
You can enable premium financing directly from payment links:
Toggle Enable IPFS Premium Financing on Payment Links
When enabled, Insured direct bill invoices will include premium financing options via IPFS.
5. Save Configuration
After completing the setup, click Save Changes to apply the configuration.
Automatic Receipt Behavior
Receipts created through AndDone behave the same as manually created receipts in BindHQ.
Receipts are automatically generated upon successful payment
The configured Receipt Account and Receipt Bank Account are applied
Payments are mapped to the specific policies selected during checkout
This ensures accurate accounting and reduces manual reconciliation effort.
AndDone-Side Setup
No manual setup is required within AndDone. BindHQ will coordinate directly with AndDone to:
Complete onboarding
Establish secure connectivity
Ensure the integration is fully functional
Payment Flow Using AndDone
The payment process applies to both new policies and endorsements:
1. Bind the Policy or Issue an Endorsement
For a new policy (Binding a Quote):
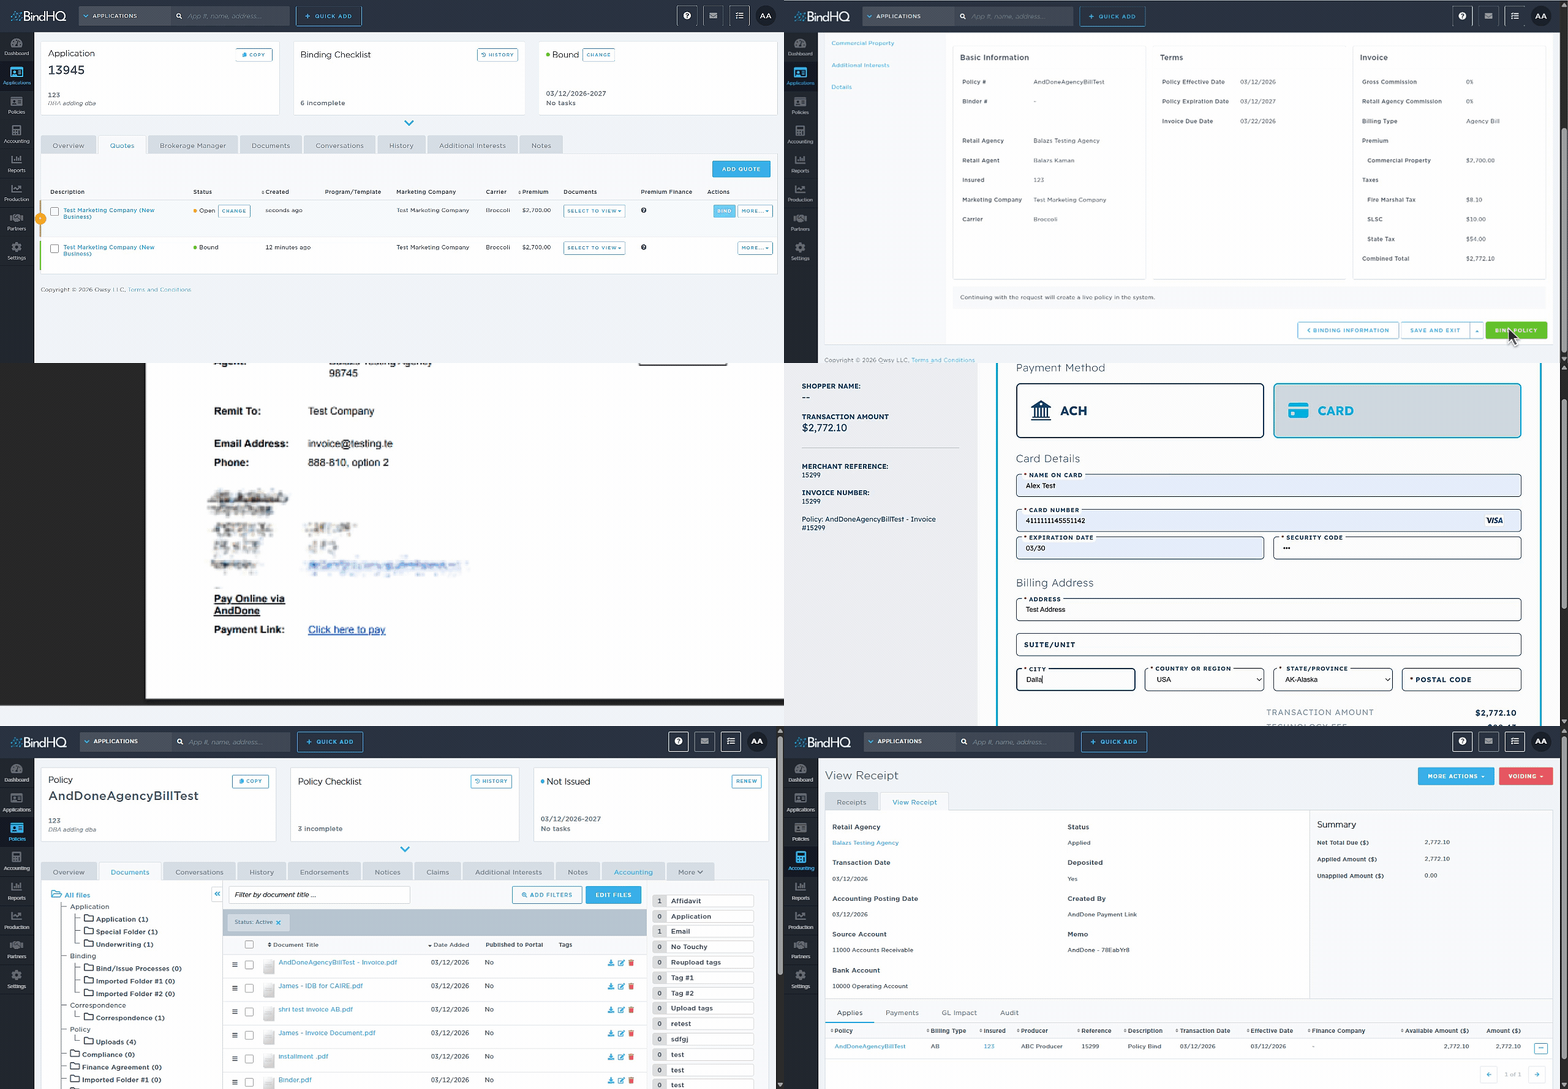
Navigate to Application → Quotes
From the Actions dropdown, click Bind
Review details across tabs and confirm by clicking Bind Policy
For an endorsement:
Navigate to the Policy → Endorsements tab
Click New Endorsement
Fill in the required details and review updates across tabs
Click Save & Exit
Click Issue to finalize the endorsement
Note: Endorsement 0 is auto-generated when a policy is bound but must be issued before creating a new endorsement. Once a policy is bound or an endorsement is issued, an invoice is generated.
2. Access the Invoice
Navigate to the Documents tab
Open the invoice document
3. Use the Payment Link
The invoice includes a “Pay Online via AndDone” section.
Click “Click here to pay”
This opens the AndDone payment page
4. Complete the Payment
On the AndDone page, the payer can:
Select ACH, credit card, or debit card
Enter payment details
Submit the payment securely
5. Payment Processing
The transaction is securely processed via AndDone
No manual intervention is required
6. Review Payment in BindHQ
After payment completion:
Go to the Accounting tab on the policy
The invoice is automatically marked as Paid
A corresponding payment entry is created
7. View Receipt & Details
Click the paid amount to view transaction details
Select View Receipt to access the generated receipt
Last Update: March 2026