Recording and Managing Receipts
Last updated: July 8, 2026
Introduction
This article explains how to record a receipt in BindHQ and view receipt details after a receipt has been created.
Receipts can be recorded against customers, policies, or insureds and can be filtered using various search criteria.
Accessing the Record a Receipt Page
To navigate to the Record a Receipt page:
Select Accounting from the left navigation menu.
Navigate to Accounts Receivable.
Click Record a Receipt.
Recording a Receipt
On the Record a Receipt page, click Record Receipt.

Select the appropriate Customer.
The following customer types are available:
Insureds
Retail Agencies
Marketing Companies
Suppliers
Set Default Filters (Optional)
Use the available filters to locate the appropriate records:
Policy Number
Insured
Select date range (optional
Use the available fields to pull records for a specific date range.
Click "Start New Receipt"

Enter Receipt Information
Complete the receipt details, including:
Receipt Amount
Payment Method
Receipt Date
Reference Number
Memo (if applicable)
Bank Account
Source Account
Apply the Receipt
Once the details have been entered, the system will pull matching transactions and display them at the bottom of the screen.
Select the invoice(s) or transaction(s) to which the payment should be applied.
Once all information has been entered and verified, save the receipt to post it to the customer's account.
Recording a Receipt from a Retail Agency or Marketing Company
You can record a receipt directly from a Retail Agency or Marketing Company record.
Open the desired Retail Agency or Marketing Company record.
Navigate to the Accounting tab.
Locate the transaction(s) or policy(ies) to which the receipt should be applied.
Select the appropriate records by checking the boxes in the Action/Status column.
Click Record Receipt in the lower-right corner of the page.
Alternatively, click With These Transactions and select Record Receipt.
The Record Receipt screen will open with the selected transactions pre-populated, allowing you to enter the payment details and apply the receipt.
Viewing Existing Receipts via Retail Agency or Marketing Company
To review receipts associated with the selected Retail Agency or Marketing Company:
Navigate to the Accounting tab.
Open the More menu.
Select View Receipts.
This will display all receipts associated with the selected entity.
Browse & View Receipts
Accessing the Browse & View Receipts Page
To view existing receipts:
Select Accounting from the left navigation menu.
Navigate to Accounts Receivable.
Click Browse & View Receipts.
This page allows you to review receipts that have been generated within BindHQ.
You can filter receipts by:
Division
Customer
Date Range
Open Receipts
Overdue Receipts
To view the details of a specific receipt, click the receipt reference number.
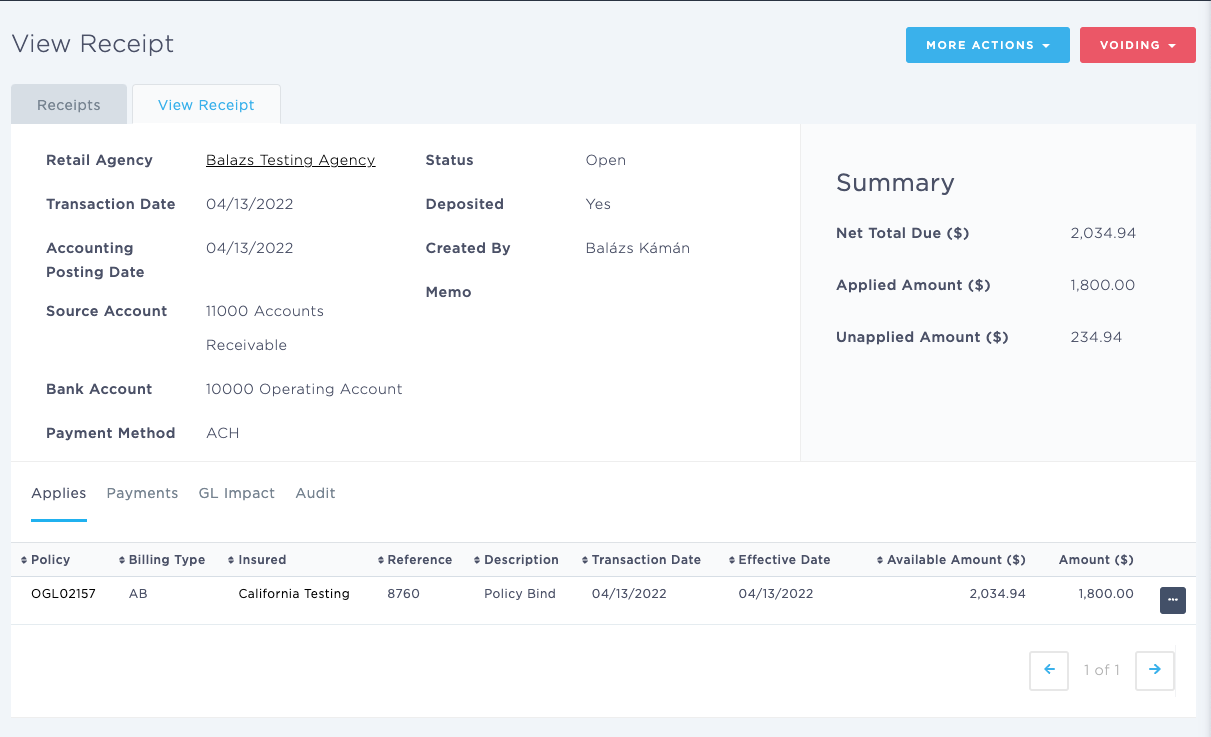
Receipt Detail Page
The Receipt Detail page provides detailed information about an individual receipt.
Receipt Information
The following information is displayed:
Customer Type
Customer Name
Posted Date
Source Account
Bank Account
Payment Method
Status
Deposited Status
Created By
Memo
Reference Number
Financial Summary
The right side of the page displays a summary of the receipt, including:
Total Amount
Amount Applied
Amount Unapplied
Available Actions
The following actions are available from the Receipt Detail page:
Receipt Actions Under More Actions Menu
Make Payment
Edit Receipt
Create New Receipt
Download CSV
Void Options
Void Receipt
NOTE: Voiding a receipt will use today's date. This date cannot be modified. Please be aware of this when voiding backdated transactions.
Applies Tab
The Applies tab displays all policies and transactions associated with the receipt.
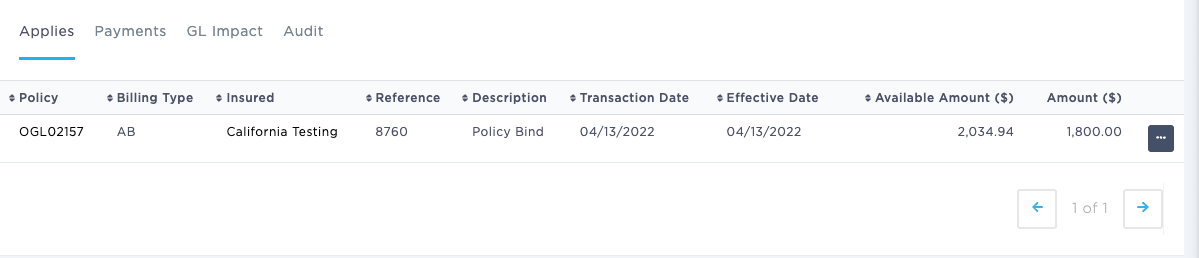
Quick Links
The Policy column links directly to the related Policy record.
The Insured column links directly to the corresponding Insured Detail page.
Payments Tab
The Payments tab displays all payments associated with the receipt.
GL Impact Tab
The GL Impact tab displays the accounting impact of the receipt on the General Ledger.
Because BindHQ uses double-entry accounting, this section shows the debit and credit entries generated by the receipt transaction.

Audit Tab
The Audit tab displays the audit history associated with the receipt, including changes made to the record and related system activity.
Last Update: May 2026